
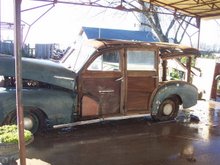
I didn't have any good templates for the roof rails that run the length of the roof, and support the bows. I used a spacer block that would ride along the top rail of the rear quarter panel to make this section of the roof rails. I made four rails for each side, cutting the top and bottom with a bevel to match the originals. They then are fastened together from the inside with wood screws
 to complete the assembly. I continued working my way towards the front of the car in this manner.
There are two areas along the roof rails where they are finger jointed together. At each joint the roof rails angle in towards the middle of the car. At the front of the cab the rails enter the metal pillars on each side of the windsheild, and attach to the header where the roof and the front cowl meet.
Once I finished the assembly of the rails I attached the front header the the cowl and roof assembly, fitted the tenon at the top of the center door pillar . I then attached the roof rails to the upper rail of the rear quarter panel using screws through the window grooves, through the roof rails, and into t-nuts. Fi
 nally I fastened the T shaped bracts that hold the lift gate header, rear pillars and the roof rails together.
I had the piece of sheet metal for the front of the roof, so I used it to locate the forward most bow. Taking measurements from the original, I fastened the rest of the bows to the roof rai
 ls.
ls.I started in the center with the roof slats, attaching them to the bows with #8 x .75" brass wood screws instead of the nails used originally. It helps to lay out the strips first, without fastening themsince they will be spaced apart slightly at the back and touching at the front
No comments:
Post a Comment